hugo 博客搭建
一、搭建博客服务:
1
2
3
4
5
6
|
# hugo 有两个版本,标准版和扩展版,推荐使用扩展版。
# mac/linx: brew install hogo-extended
# windows: scoop install hugo-extended
hugo new site my_blog
cd my_blog/
hugo server -D
|
二、安装主题:
Hugo Themes 上寻找顺眼的主题
 1
 2
 3
 4
 5
 6
 7
 8
 9
10
11
12
|
# 安装主题
git clone https://github.com/CaiJimmy/hugo-theme-stack/ themes/hugo-theme-stack

# 基础设置
# mac/linux: rm -r ./content
# win: Remove-Item -Recurse -Force ./content
cp -r themes/hugo-theme-stack/exampleSite/content ./
cp themes/hugo-theme-stack/exampleSite/hugo.yaml ./
# 存在youtube链接
# rm -r content/post/rich-content
# 删除默认配置
rm hugo.toml
|
注:为了与配置文件中 theme 配置项对应,需要去除下载的主题文件夹的后缀。
三、文章:
一般存放在 content/post 目录下,每篇文章对应一个文件夹,文件夹名就是文章名。
1
|
hugo new content post/myFirstBlog/index.md
|
四、国际化
根据文章后缀名进行判断,没加则使用默认语言。
hugo 配置项
以 stack 主题为例,修改 hugo.yaml 文件
注:
- 网站图标:浏览器搜索“ico 下载”,例如 Tabler Icons,下载图标并放到
static 目录下,并改命为 favicon.ico
- 头像:
assets/img/avatar.png,大小 150x150
- go 日期格式比较奇葩,推荐参考官方文档。
- 评论系统:推荐使用
utterance,基于 github 仓库评论机制。
- 小部件:
layouts/partials/widget 下,例如自定义部件 Aplayer+MetingJs。
- 亮暗模式:
assets/scss/partials/highlight/ 下
- 链接图标:
aseets/icons/ 下
github 常规部署
目标:将 hugo -D 编译好的 public 文件夹部署成静态页面
一、github 上创建公有仓库
仓库名推荐:用户名.github.io,这样后续生成的静态网站没有后缀名。
二、上传
修改配置文件中的 baseurl 为 https://用户名.github.io/,注意是否有子路径。注:baseURL 必须以 / 结尾。
进入 public 目录,创建仓库
1
2
3
4
5
6
7
|
# github上的上传流程
git init
git add .
git commit -m "first commit"
git branch -M main
git remote add origin https://github.com/Spencer6-7/Spencer6-7.github.io.git
git push -u origin main
|
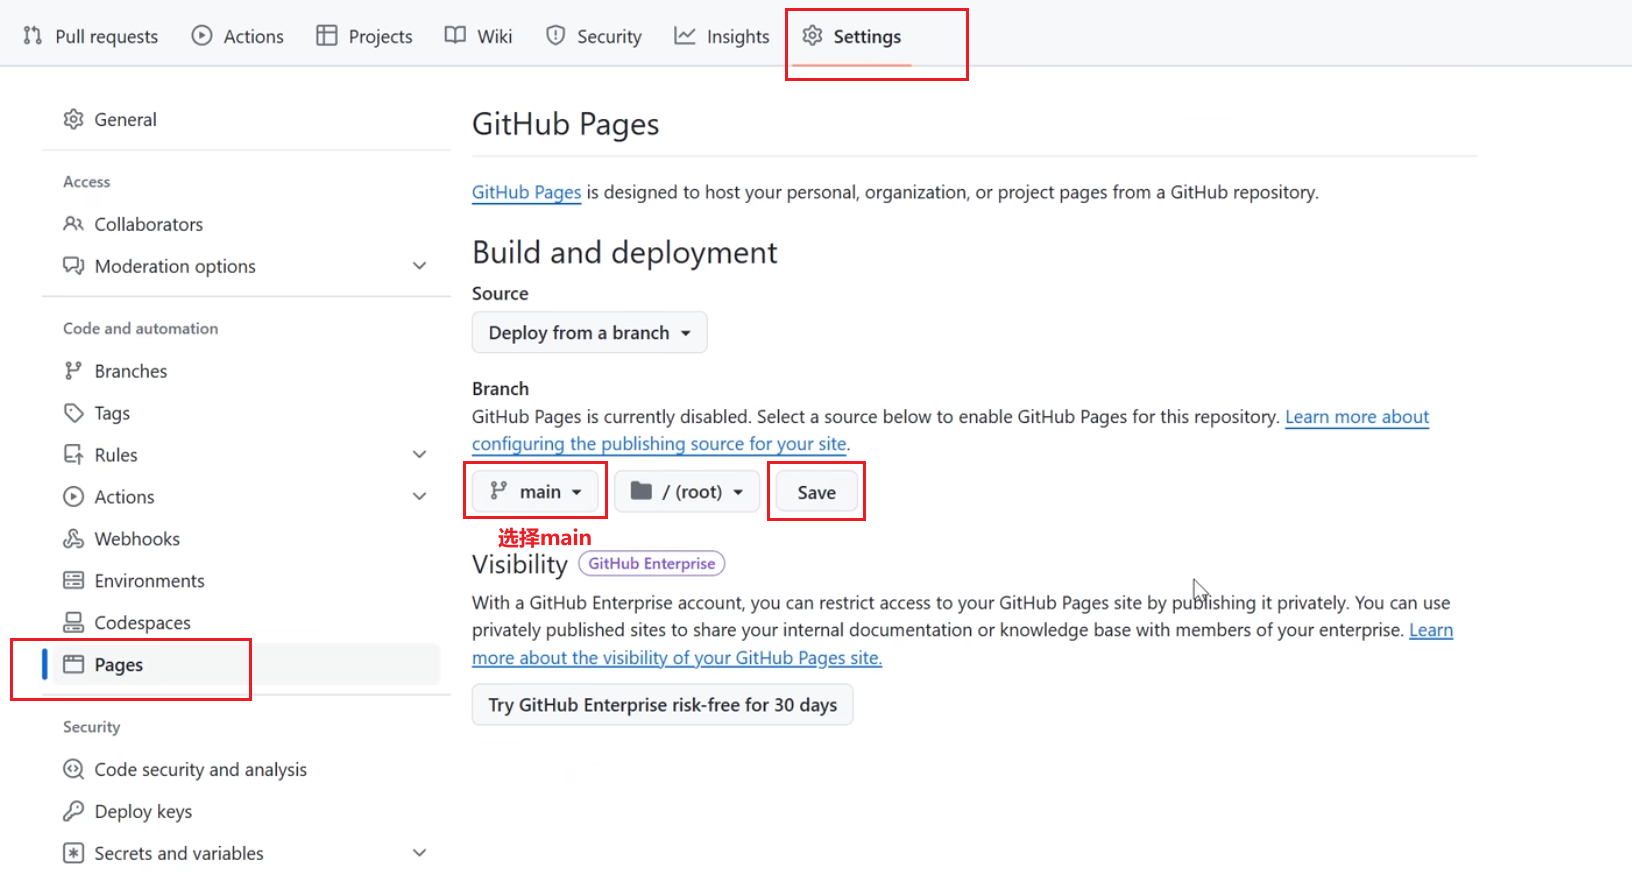
三、开启静态页面(可能不需要手动开启)
git action 自动部署
问题:每次需要手动生成、上传 public/ 比较麻烦,如何利用 git action 实现自动化部署
目标:写完文章后只需要提交主目录代码,利用 github action 自动生成 public/ ,并上传到公有仓库(对应静态网站)中。
一、创建私有仓库,存放 hugo 的源文件
二、创建 .gitignore ,避免上传某些文件
1
2
3
4
5
6
7
8
|
touch .gitignore
vim .gitignore
# 填入
public
resources
.hugo_build.lock
hugo.exe
hugo.yaml
|
二 、action 脚本
1
2
3
|
mkdir .github/workflows
cd .github/workflows
touch hugo_deploy.yaml
|
1
2
3
4
5
6
7
8
9
10
11
12
13
14
15
16
17
18
19
20
21
22
23
24
25
26
27
28
29
30
31
32
33
34
35
|
name: deploy
# 代码提交到main分支时触发github action
on:
push:
branches:
- main
jobs:
deploy:
runs-on: ubuntu-latest
steps:
- name: Checkout
uses: actions/checkout@v4
with:
submodules: true
fetch-depth: 0
- name: Setup Hugo
uses: peaceiris/actions-hugo@v3
with:
hugo-version: "latest"
extended: true
- name: Build Web
run: hugo -D
- name: Deploy Web
uses: peaceiris/actions-gh-pages@v4
with:
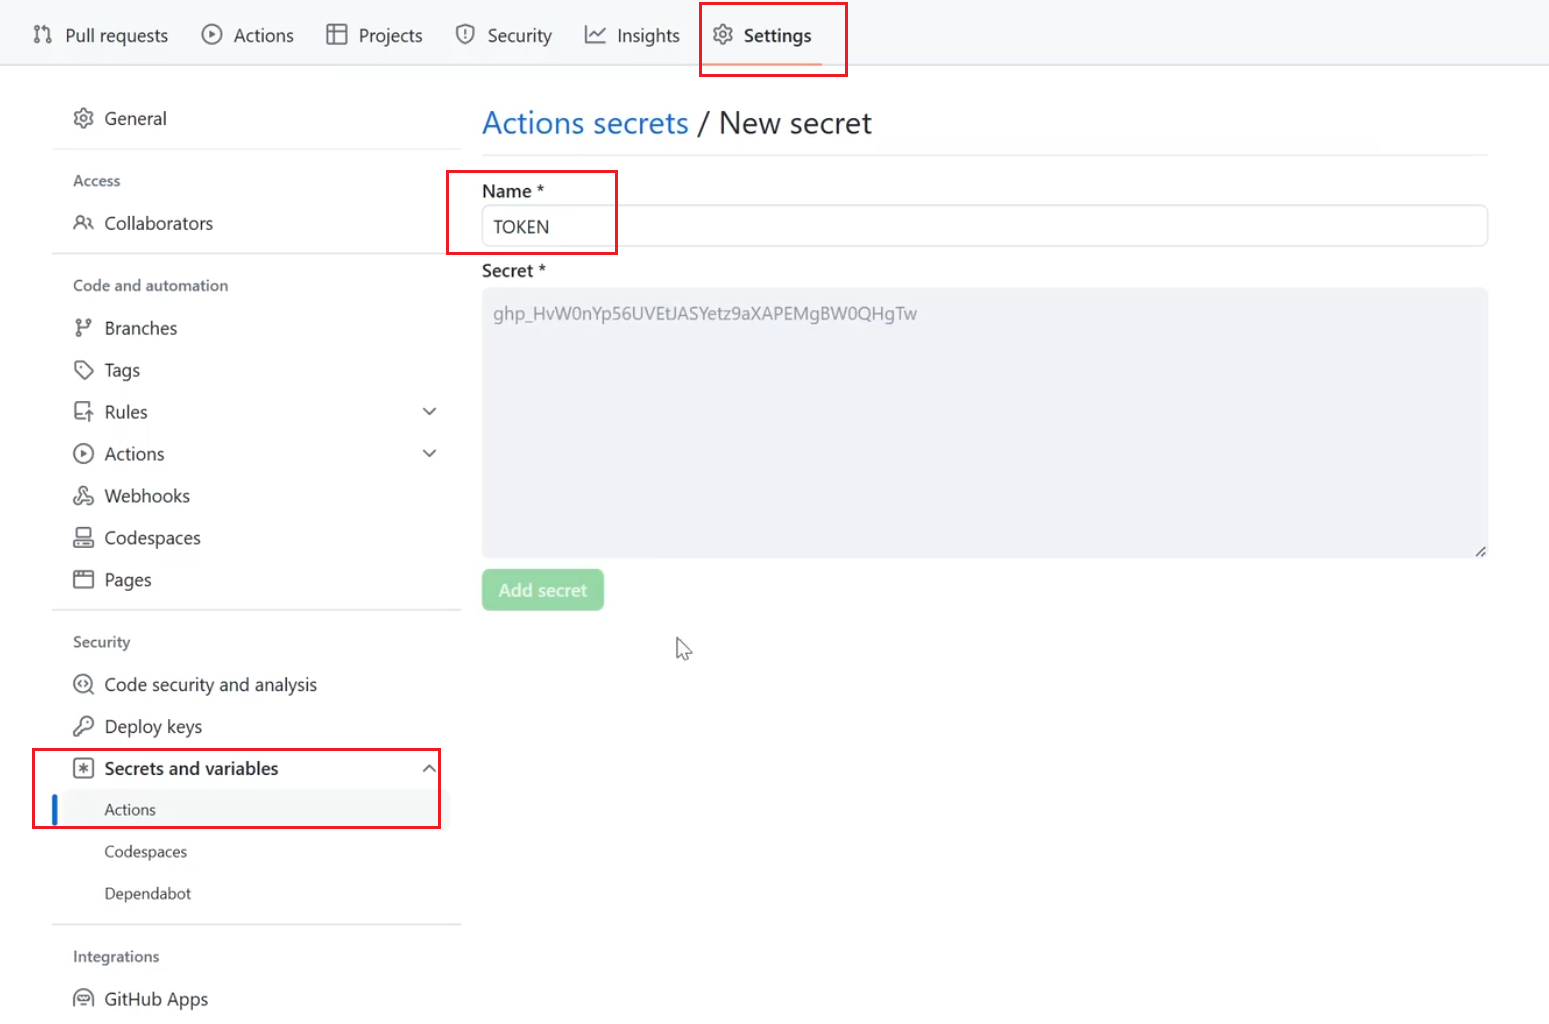
PERSONAL_TOKEN: ${{ secrets.你的token变量名 }}
EXTERNAL_REPOSITORY: 你的github名/你的仓库名
PUBLISH_BRANCH: main
PUBLISH_DIR: ./public
commit_message: auto deploy
|
注:
四、上传
1
2
3
4
5
6
7
|
# github上传流程
git init
git add .
git commit -m "first commit"
git branch -M main
git remote add origin https://github.com/Spencer6-7/my_blog.git
git push -u origin main
|
obsidian 集成
可以使用 quickadd 调用脚本实现 push+coding 实现自动发布,都不用离开 obsidian。然后要发的博客可以使用 obsidian to Hugo 插件去把某个文章推送的 Hugo 中
主题推荐
dream
dream
markdown 头部配置样例
1
2
3
4
5
6
7
8
9
10
11
12
13
14
15
16
17
18
19
|
---
title: 文章名称,大标题
date: 2025-05-03
author: 作者名称
# 作者头像,可以是网络链接,也可以是项目中的图片地址
avatar: 作者头像,可以是网络链接,也可以是项目中的图片地址
# 分类名称,展示在分类列表中
categories: 分类名称
# 标签名称, 展示在tag列表中
tags: 标签1, 标签2
# 系列名称
series: 系列名称
# 封面图片,可以是网络链接,也可以是项目中的图片地址
cover: 封面图片,可以是网络链接,也可以是项目中的图片地址
# 如果需要数学公式,请将此字段设置为true
math: true
# 如果需要渲染流程图,请将此字段设置为true
mermaid: true
---
|
stack
参考文章模板 (Obsidian 建议创建相同的模板):
1
2
3
4
5
6
7
8
9
10
11
12
13
14
15
16
17
|
---
title: 博客介绍
share: "true"
categories:
  - Blog
tags:
  - 介绍
description:
author: TRG
dir: posts
showToc: "true"
ShowReadingTime: "true"
ShowWordCount: "true"
ShowRssButtonInSectionTermList: "true"
UseHugoToc: "true"
date: 2024-10-16T12:16:04+08:00
---
|